This post I will show you an easy step to use Touch ID in your app. First let create project with single view application.

To use Touch ID we have to add LocalAuthentication Framework to our project. Go to project setting and select Build Phase tap.

In Link Binary With Libraries section,click on + button and search for LocalAuthentication framework.

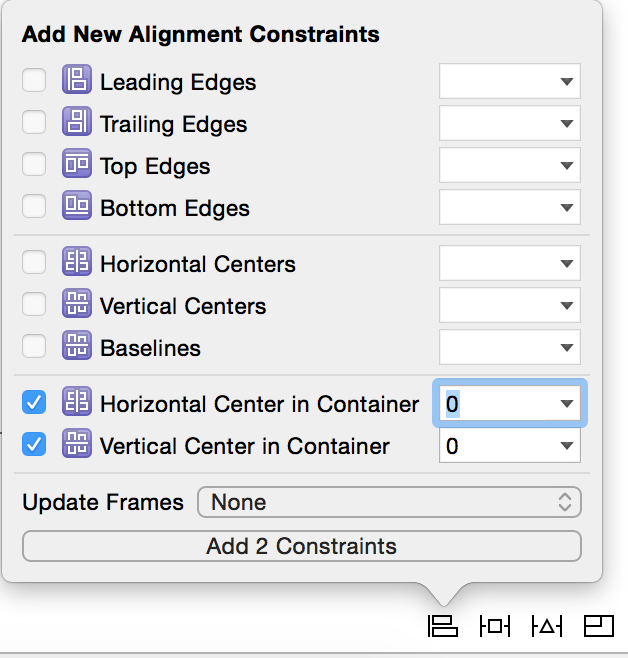
Next, Open Storyboard and drag button in. We will use button action to popup authentication view.  In Xcode 6, Apple introduce Size Class and let us to use much more auto layout. So if I want to set my button to show in the centre of the screen. very easy way is click align icon and check mark on Horizontal center in Contrainer and Vertical center in Contrainer.
  Then link button action to ViewController class.
  Go to ViewController.m and Import LocalAuthentication.
#import <LocalAuthentication/LocalAuthentication.h>
OK now we ready to use Touch ID feature! Find touchAction method we will put in all code here. ![]() First step of using Touch ID is let OS evaluate your device can use TouchID.
First step of using Touch ID is let OS evaluate your device can use TouchID.
LAContext *context = [[LAContext alloc] init];
NSError *error = nil;
if ([context canEvaluatePolicy:LAPolicyDeviceOwnerAuthenticationWithBiometrics error:&error]) {
 //If can use TouchID code go here
}else{
//If not
}
If you build and run now nothing happen because canEvaluatePolicy is only check device and use Touch ID or not. Next , we will handle success case.put this code in if block.
[context evaluatePolicy:LAPolicyDeviceOwnerAuthenticationWithBiometrics localizedReason:@"Come and touch me" reply:^(BOOL success, NSError *error) {
//Handle popup even
 }];
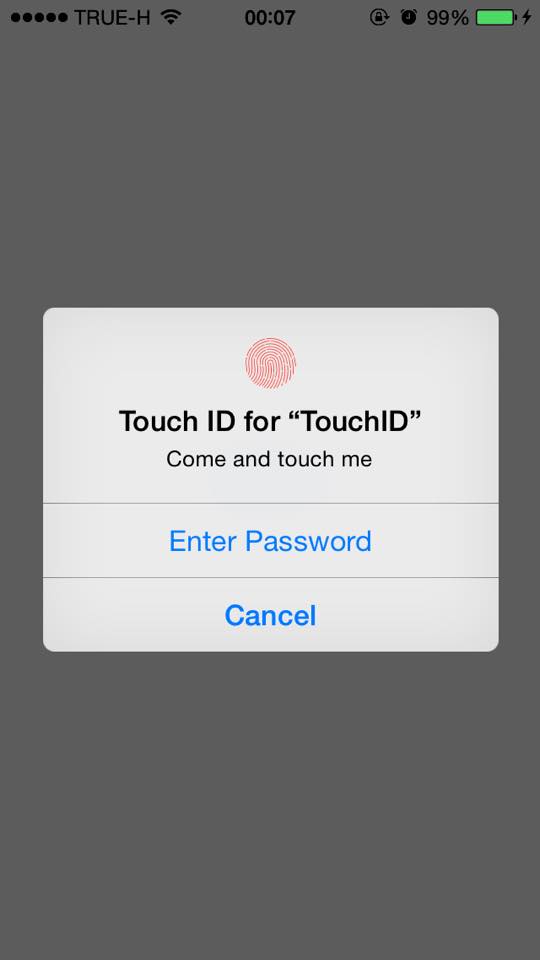
This code will popup Touch ID view.you can build and run to check the result.(Only in device )  As you see in picture above , you can scan your finger or enter password or cancel that mean you have to handle all of this action. Look into
reply:^(BOOL success, NSError *error) {
//Handle popup even
 }];
In this block we will handle success case and failed case (failed case is user choose enter password or cancel or other error case)
if (success) {
UIAlertView *alert = [[UIAlertView alloc] initWithTitle:@"Success"   message:@":)" delegate:nil
cancelButtonTitle:@"Ok" otherButtonTitles:nil];
 [alert show];
} else {
NSString *failureReason;
 switch (error.code) {
case LAErrorAuthenticationFailed:
failureReason = @"authentication failed";
 break;
case LAErrorUserCancel:
failureReason = @"user canceled authentication";
break;
 case LAErrorSystemCancel:
 failureReason = @"system canceled authentication";
 break;
case LAErrorPasscodeNotSet:
 failureReason = @"passcode not set";
 break;
LAErrorUserFallback:
 failureReason = @"user chose password";
 break;
 default:
failureReason = @"unable to authenticate user";
break;
 }
NSLog(@"%@",failureReason);
 UIAlertView *alert = [[UIAlertView alloc] initWithTitle:@"Error"
message:error.localizedDescription delegate:nil cancelButtonTitle:@"Ok"
otherButtonTitles:nil];
 [alert show];
}
In fail case , you can handle many error case from LAError. Build and run your project and try all of it case:) here is project example code. If you have any question feel free to ask me:)